Cyberstakes CTF 2020: Into the Metaverse
Category: Reverse Engineering
Points: 450
Challenge
We extracted the DRM module from a target device but haven’t been able to reverse engineer its validation logic. See what you can do: metaverse
Hints
- Have you heard of ‘virtualization obfuscation’?
- The custom VM architecture is based on a ‘stack machine cpu’
- Debugging a virtualized obfuscator can be hard… it might be best to extract the VM ’logic’ and emulate it!
Background
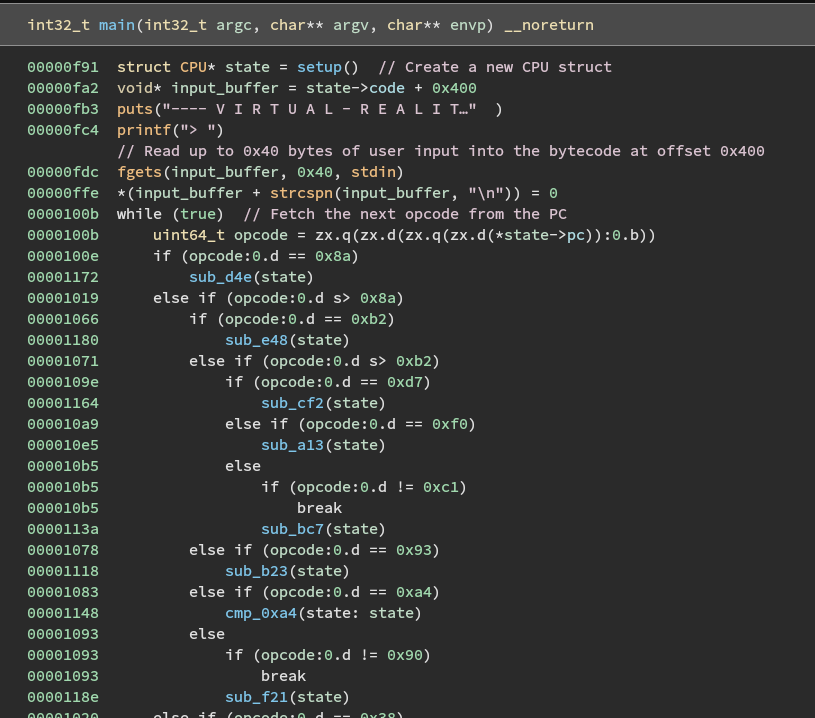
Opening the metaverse program in Binary Ninja, we notice what looks like a fetch-decode-execute cycle in the main function. This makes sense given the hint that the program is obfuscated using a virtualization obfuscator. Virtualization obfuscators are employed to protect software from being reverse engineered by converting a program’s original code into an undocumented bytecode that gets executed at runtime by an interpreter. Since the actual program logic is “packed” in an unknown representation, it cannot be analyzed using traditional tools without time-consuming manual effort.
Reversing main
The program starts with a call to some kind of setup function that initializes the virtual machine’s state and returns a pointer to what I’ve named a CPU structure.
The user’s password input is then read into a buffer by fgets.
Lastly, the program enters a while loop where it fetches the next opcode from instruction memory, decodes it to find the correct instruction handler function, and then executes it.
This while loop is the interpreter that actually executes the real program over our input.
Reversing setup
Reversing the setup function reveals the layout of the virtual machine in memory and the fields of the CPU structure.
First, the CPU struct is created on the heap with a call to malloc.
The function then allocates a region of 0x800 bytes where it stores contents starting from address 0x202020 of the data section.
Given what we know about virtualization obfuscators, we can assume that these bytes are the virtualized instructions to be executed by the interpreter.
Next, the function allocates another region of 0x800 bytes but this time it explicitly zeroes out the memory. One of the hints indicated that the VM uses a stack machine. This means that we should expect to see two memory regions; one for instructions and one for the stack. Since the previously allocated space appears to contain the bytecode, we can safely label this region as the stack.
For registers, stack machines typically contain only a program counter and a stack pointer.
We can see that these are both initialized at the end of setup.
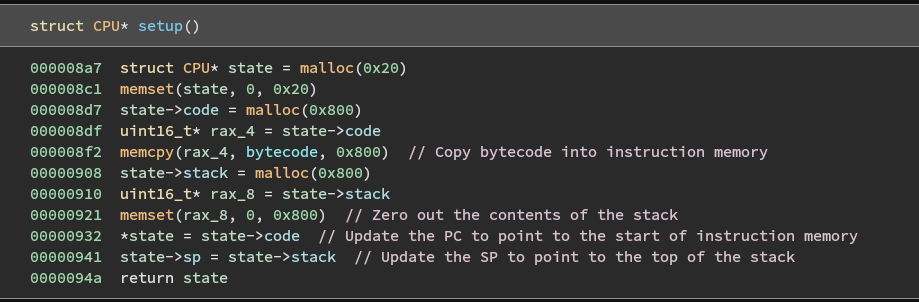
Our final definition for the CPU structure is as follows:
struct CPU {
    uint16_t* pc;
    uint16_t* sp;
    uint16_t* code;
    uint16_t* stack;
};
Instruction Handlers
The remaining functions in the program are instruction handlers.
Each one implements the execution logic for a different opcode from the virtualized instruction set.
We can identify which opcode maps to each handler by looking at the interpreter loop in main.
Comparing the handler functions, we can easily identify the add, sub, xor, and cmp instructions by looking at the operator that differs between them. Each of these handlers uses the same logic to pop two arguments from the stack, perform the operation on them, push the result to the stack, and then increment the program counter.

It is reasonable to assume that this compare instruction is what checks each character of our input against the flag.
To test this assumption, we can run the program in a debugger and set a breakpoint on the cmp instruction.
Since the competition’s flag format is ACI{flag}, we will use the ACI prefix in our input.
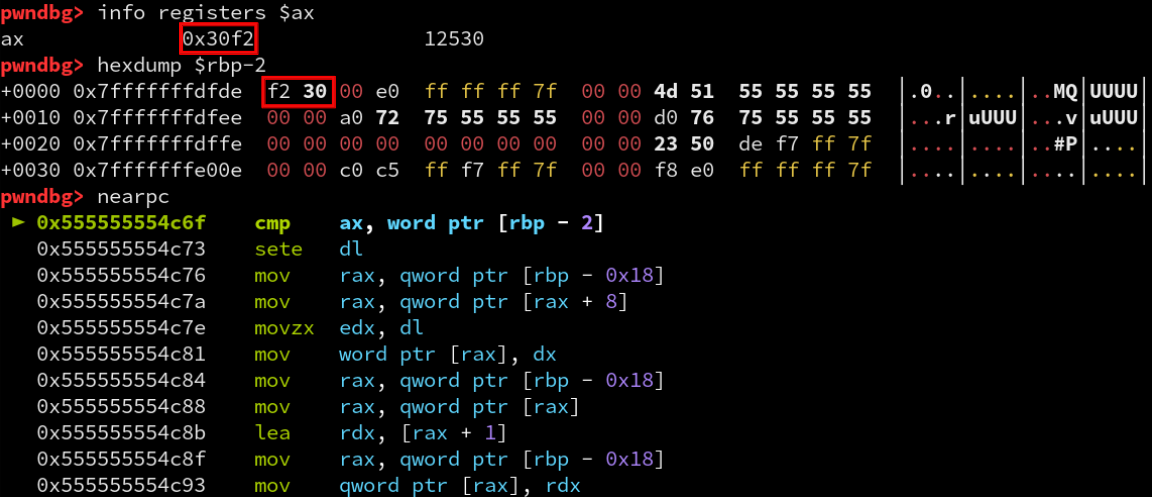
The comparison returns true for its first execution implying that the “A” is correct, however it is not directly comparing ASCII characters but a 16-bit value of 0x30f2. This means that our input is being encoded in some way before being compared with the encoded flag. If we look back at the bytecode array in the data section, we can see that there is a group of 0x20 bytes starting at offset 0x500 into the array that begins with the value 0x30f2.
We have located the encoded flag and we have identified where the comparisons take place.
If we continue to the next compare instructions in GDB, we note that the program does not exit early upon a failed comparison but simply continues until it reaches the halt instruction (opcode 0x62). This is interesting to note because it means the program is not vulnerable to a side-channel attack where we could track the number of instructions it executes.
Opcodes
The final opcode table looks something like this:
| Opcode | Name | Description |
|---|---|---|
| 0x22 | enc1 | Swaps the lower nibbles of a word |
| 0xd7 | enc2 | Swaps the upper nibbles of a word |
| 0xf0 | xor | Xors two args |
| 0xc1 | store | Write arg1 to [arg2 * 2] |
| 0x93 | pop | Stores a word from stack into instruction memory |
| 0xa4 | cmp | Compares two args |
| 0x90 | nop | No operation |
| 0x38 | swap | Swaps two args |
| 0x43 | add | Adds two args |
| 0x51 | sub | Subtracts two args |
| 0x62 | halt | Prints either “Flag Captured!” or “Wrong!” and exits |
| 0x12 | copy? | Copies word from stack and shifts it right |
| 0x02 | ld | Load word from instruction memory onto stack |
| 0x8a | loop | Runs the encoding loop |
| 0xb2 | jmp2? | Something control flow related |
Solution
There are three approaches we could take:
- Write a custom emulator for the virtualized instruction set to debug the bytecode
- Use Unicorn to bruteforce it by emulating up to the cmp instruction and testing whether the value is encoded correctly
- See if Angr can handle finding a path to the halt function
Proceeding with the first option, we can write a script that executes the same interpreter loop but in a way that allows us to easily debug it.
We begin by performing the same logic as the setup function to initialize the CPU state:
# The constant bytecode array extracted from the metaverse program
BYTECODE = bytearray([
    0x90, 0x93, 0x2e, 0x00, 0x8a, 0x1a, 0x93, 0x00, 0x03, 0x02, 0x93, 0x14, 0x00, 0x43, 0x12, 0x02,
    ... snip ...
])

class CPU:
    def __init__(self, flag):
        # Mimics the setup function from the actual program
        self.code = BYTECODE
        self.stack = bytearray([0] * 0x800)
        self.pc = 0
        self.sp = 0

        # Write the user input into memory at the expected location
        flag += "\n"
        for i in range(len(flag)):
            self.code[0x400 + i] = ord(flag[i])
Next we need to implement the interpreter itself. To do this, we need to copy over each instruction handler and ensure that it outputs the same results as the actual program. Binary Ninja’s HLIL provides excellent decompilation of these functions, which makes it fairly straight forward to copy/paste them into our script. Obviously this still requires a bit of work to remove things like pointers and convert the array accesses to work with our Python arrays.
def run(self):
    while True:
        opcode = self.code[self.pc]
        print("[PC: {:04x} | SP: {:04x} | Opcode: {:04x}]".format(self.pc, self.sp, opcode))

        if opcode == 0x43:  # add
            op1 = (self.stack[self.sp + 1] << 8) | self.stack[self.sp]
            op2 = (self.stack[self.sp - 1] << 8) | self.stack[self.sp - 2]
            self.sp -= 2

            result = (op1 + op2)
            print("add {:04x}, {:04x} = {:04x}".format(op1, op2, result))

            self.stack[self.sp] = result & 0xff
            self.stack[self.sp + 1] = (result >> 8) & 0xff
            self.pc += 1

        elif opcode == 0xa4:  # cmp
            op1 = (self.stack[self.sp + 1] << 8) | self.stack[self.sp]
            op2 = (self.stack[self.sp - 1] << 8) | self.stack[self.sp - 2]
            self.sp -= 2

            result = int(op1 == op2)
            print("cmp {:04x}, {:04x} = {:04x}".format(op1, op2, bool(result)))

            self.stack[self.sp] = result & 0xff
            self.stack[self.sp + 1] = (result >> 8)
            self.pc += 1
        elif ... snip ...
The full emulator script can be found here.
As we implement each handler, it is important to verify with GDB that the values on the stack before and after the function calls are the same otherwise we will have headaches tracing back incorrect outputs later on.
Using our emulator, we can now run the bytecode program on our input and trace what virtualized instructions get called. The user input is placed at 0x400 in instruction memory and the encoded flag is stored at 0x500. The program seems to perform quite a bit of setup at the start, so we grep for our user input.
ld [0400]
enc1 4341 = 4314          ; Swap the lower nibbles of the first two characters
pop c0de
add c0de, 4314 = 103f2    ; Add the word 0xc0de to the value
enc2 03f2 = 30f2          ; Swap the upper nibbles
store [0400], 30f2        ; Write the encoded value back to instruction memory
A word of the user input is read from address 0x400, encoded, and then placed back at the same location. This process is repeated over the entire input. The compare instructions are then used to check whether each word of the encoded input equals the encoded flag.
Using our understanding of the encoding algorithm, we can easily perform the reverse operations on the actual encoded flag itself.
flag = ""
flaghash = BYTECODE[0x500:0x520]  # Extract the encoded flag from the instruction memory

for i in range(0, len(flaghash), 2):
    op1 = flaghash[i]
    op2 = flaghash[i + 1]

    # Undo the second swap
    op2 = (op2 & 0xff00) | (op2 << 4) & 0xf0 | (op2 >> 4) & 0xf

    # Subtract the word 0xc0de
    result = (op2 << 8 | op1)
    if result < 0xc0de:
        result += 0x10000

    result -= 0xc0de
    op1 = result & 0xff
    op2 = result >> 8

    # Undo the first swap
    op1 = (op1 & 0xff00) | (op1 << 4) & 0xf0 | (op1 >> 4) & 0xf

    flag += chr(op1)
    flag += chr(op2)

print("FLAG: {}".format(flag))
Flag: ACI{2d54f989577bcfc823471412d0e}